Another trick I do to smooth up feeding of the Ruger magazines,,,,,
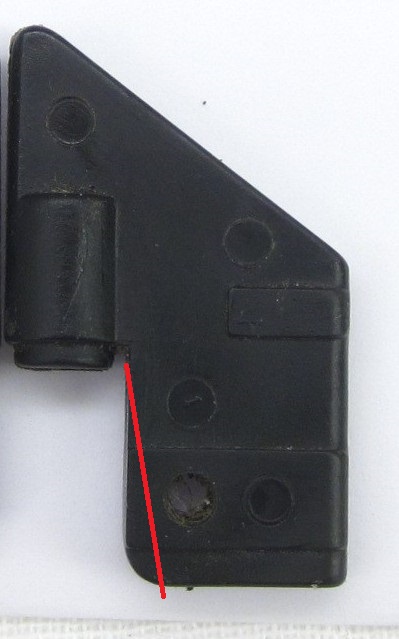
I will grind up to about the red mark in the picture below to prevent the coil spring from "bunching up" against the follower and causing "jumpy" feeding action as the coils "un-bind" themselves from being wedged against the follower. This in no way affects stability of the follower.
I am SURE to always leave enough "meat" around the pin hole
RUGER MARK SERIES
Magazines
.
(eventually when I get done) EVERYTHING you could possibly want to know,,,,
If I'm missing anything, have something wrong
or you would like to see additional information,,
LET ME KNOW
Just click here or email wirthweinguns@gmail.com
Or call 812-853-5007
Still Working on this page
But have some info up,,
Ruger has used pretty much used the same magazine from the beginning
BUT there are some differences outlined below (when I get to it)
AS WELL as some techniques to make them more reliable

I have been working on this for about a year in my own shooting,,,,,
And helping some others,,
SO,, it is not an exact solution just yet.
Basically I have found MOST new magazines are not "open" enough in the feeding area,,
ALSO you can use your magazine as a gauge to see different rim sizes, load 10 rounds and make note of where your button ends up with various ammo, it will vary.
I use a TWO PART fix to get magazines to feed right
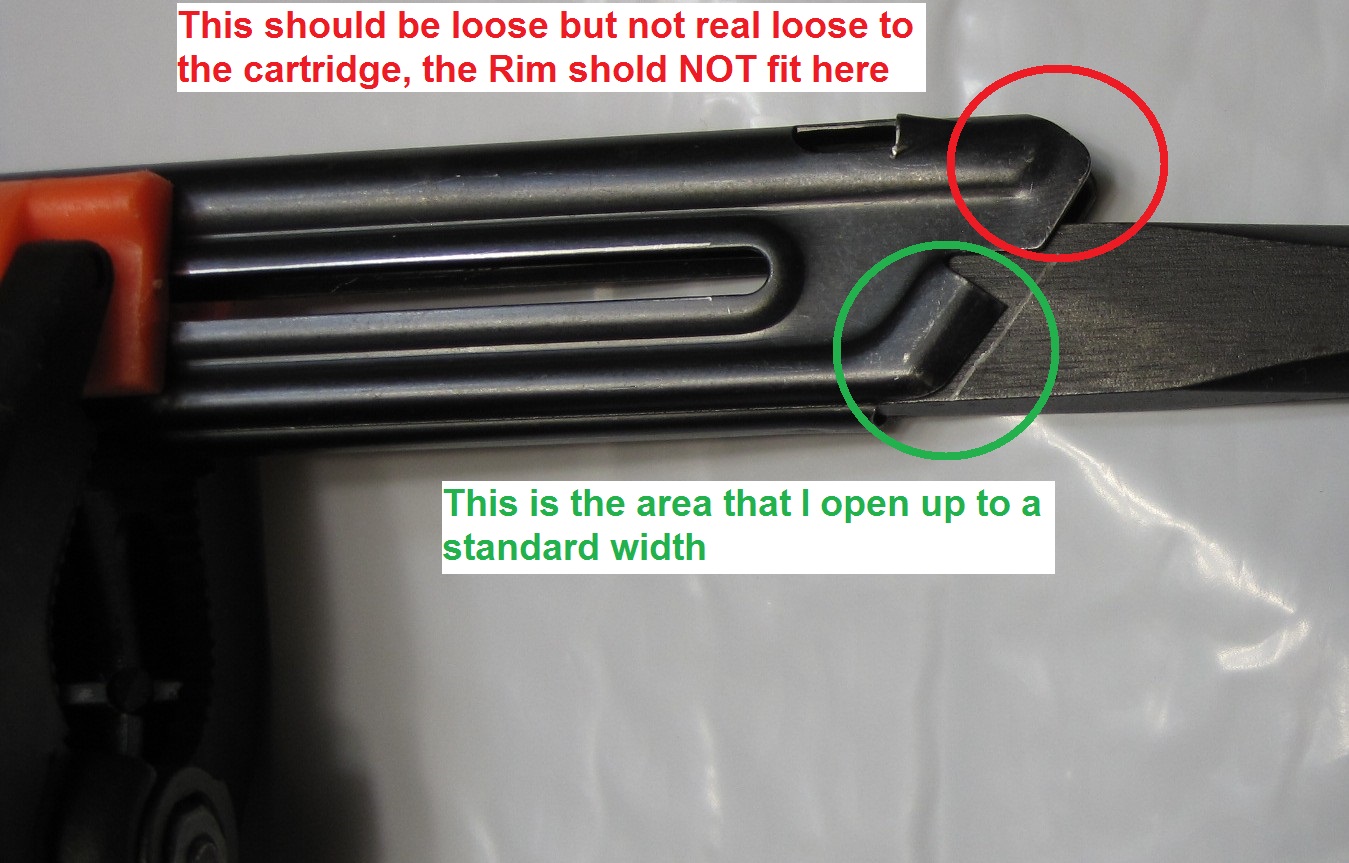
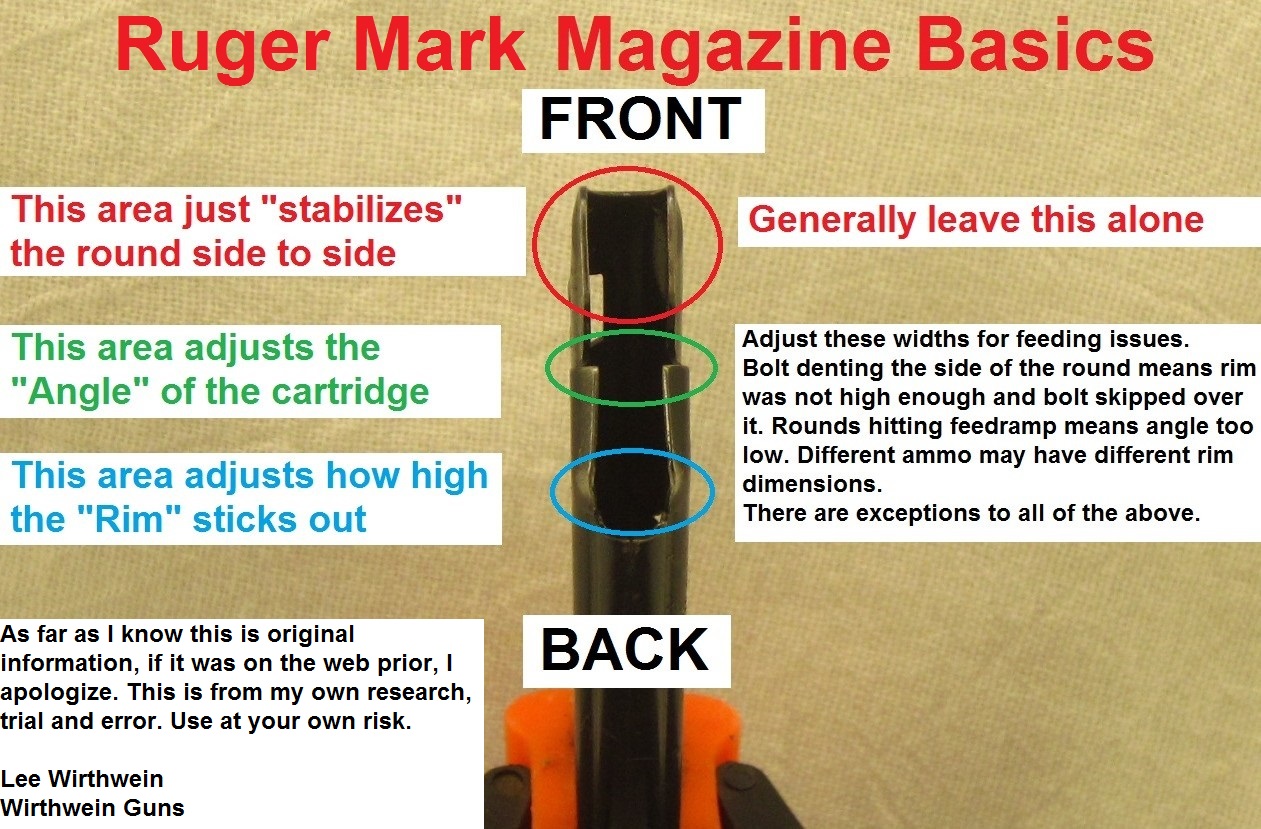
The rear lips control the height and angle of the round. It's a two step procedure to get the feeding correct. The "rear" of the rear lips controls height, open this area to get round higher in magazine so bolt will grab it properly.
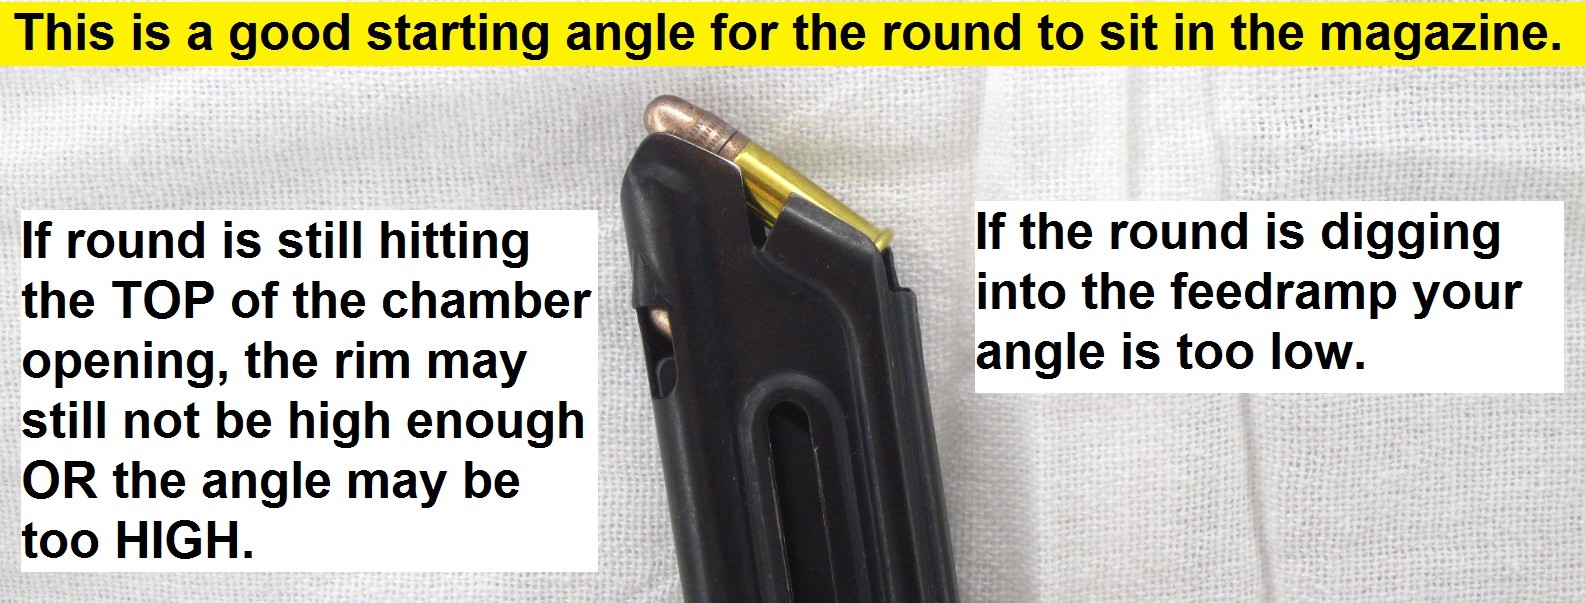
The "front" of the rear lips controls the angle of the round, once you open the rear you load a few rounds in the magazine and test how high the nose can go without forcing it. The top of the FRONT lips should land about middle of round and you can adjust angle from there for feeding,, you can tighten or open it to adjust angle.
The MAIN thing is to get rims engaging the bolt properly so that is the first step.
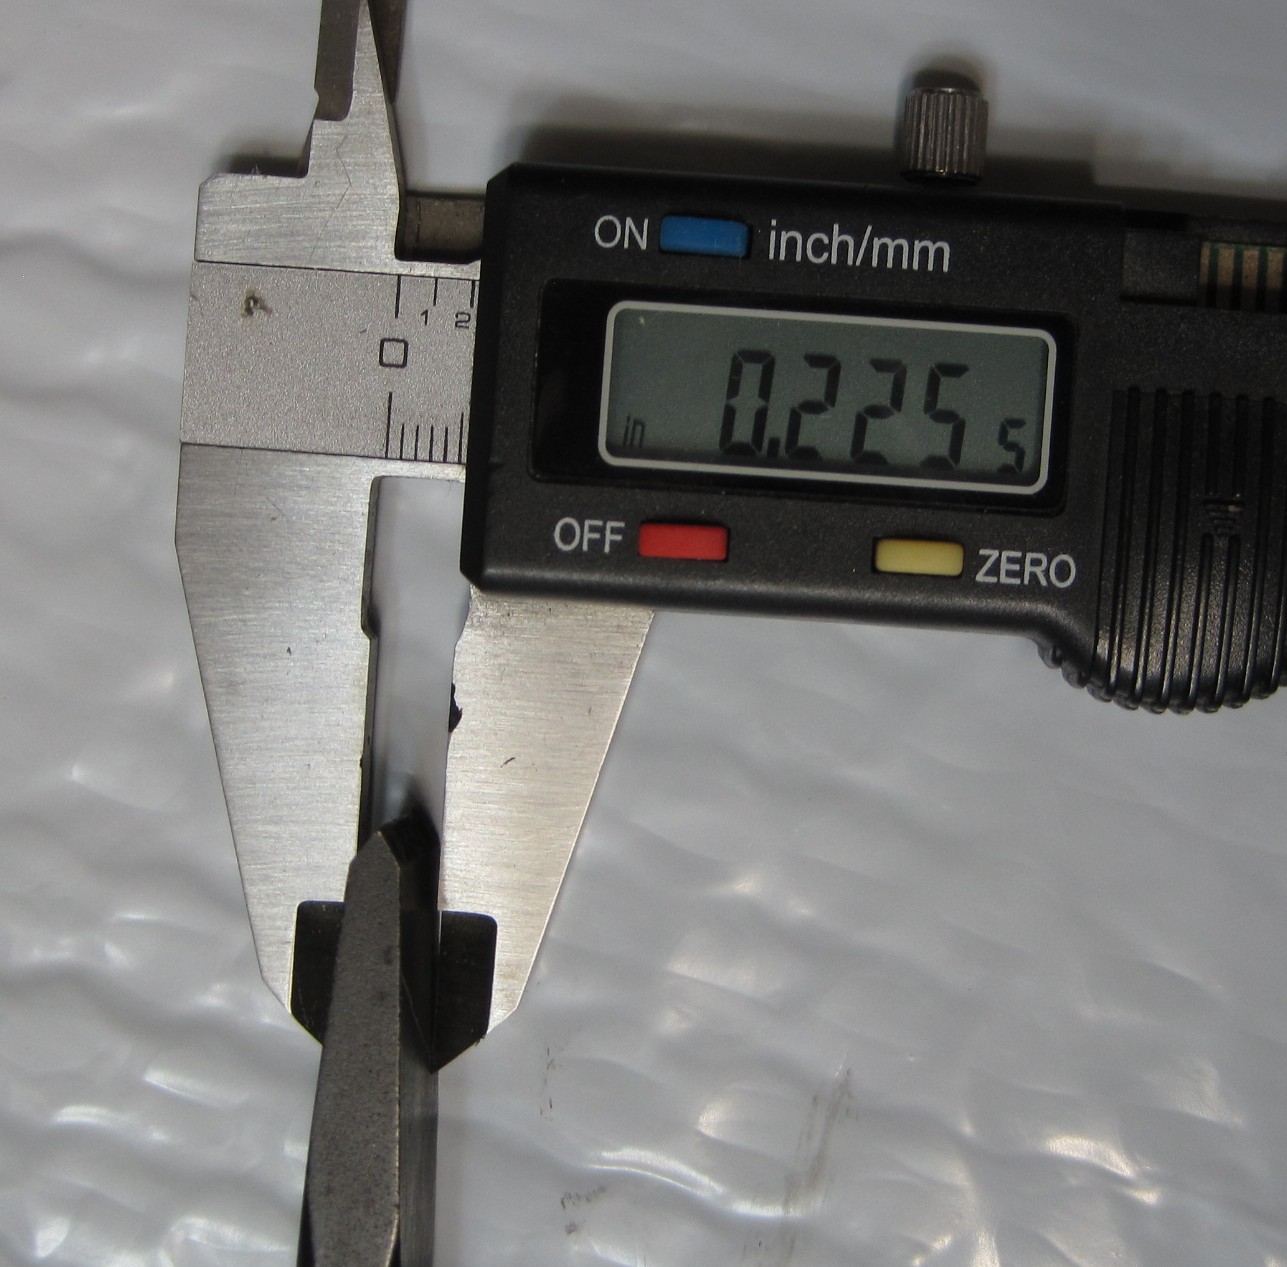
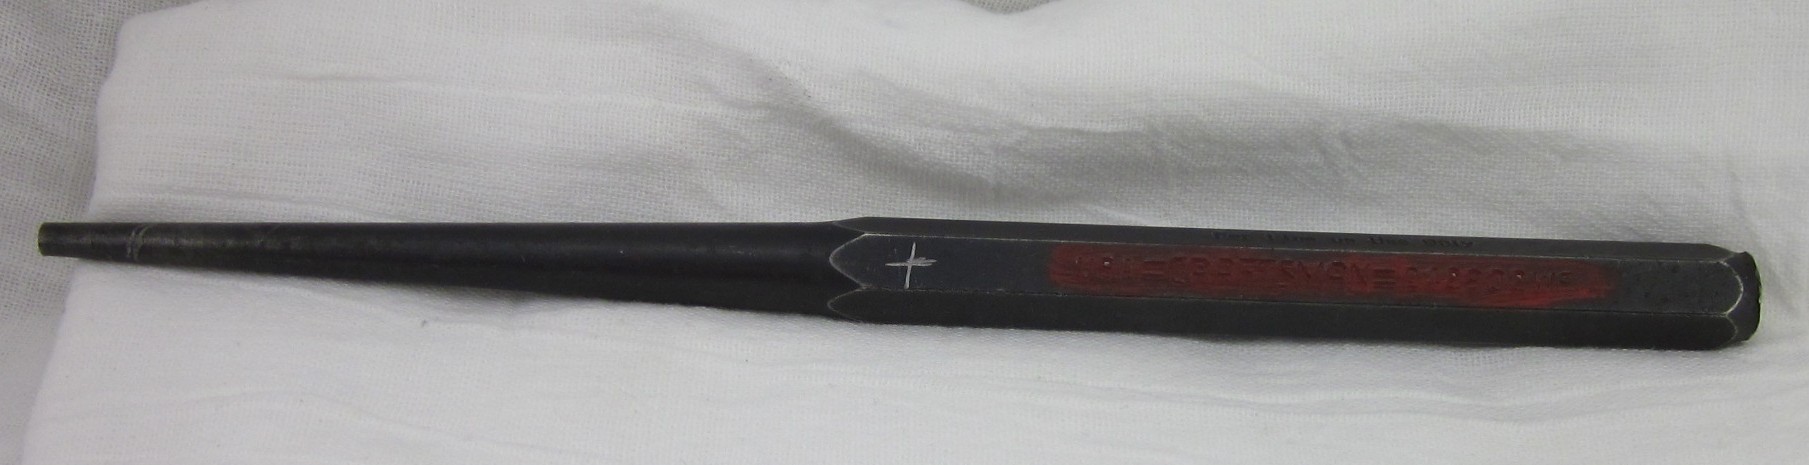
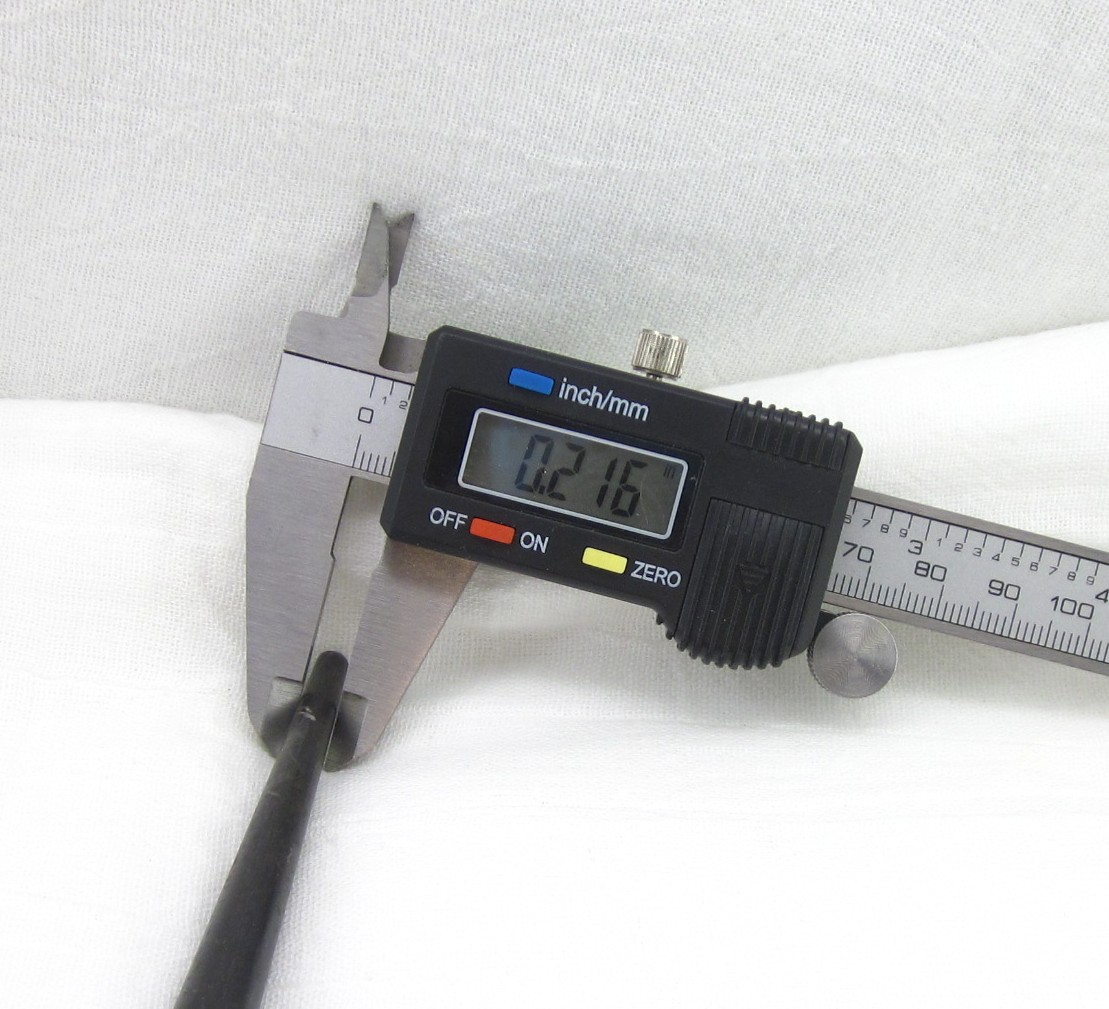
1) For the "Rim Height" I use the PUNCH pictured below with the measurement shown
I make an index mark on the punch at the specified measurement.
Force it into the magazine at the REAR as shown lined up parallel with the magazine body.
I carefully do this until I get to the measurement I want
I need to go PAST the index mark I made because the body will spring back some.
I want it to just GAGE at the index mark, I want it to hit the mark "freely" not forced.
This is just a good measurement but rarely I may find it too much or too little for a pistol,
I adjust it to my needs.
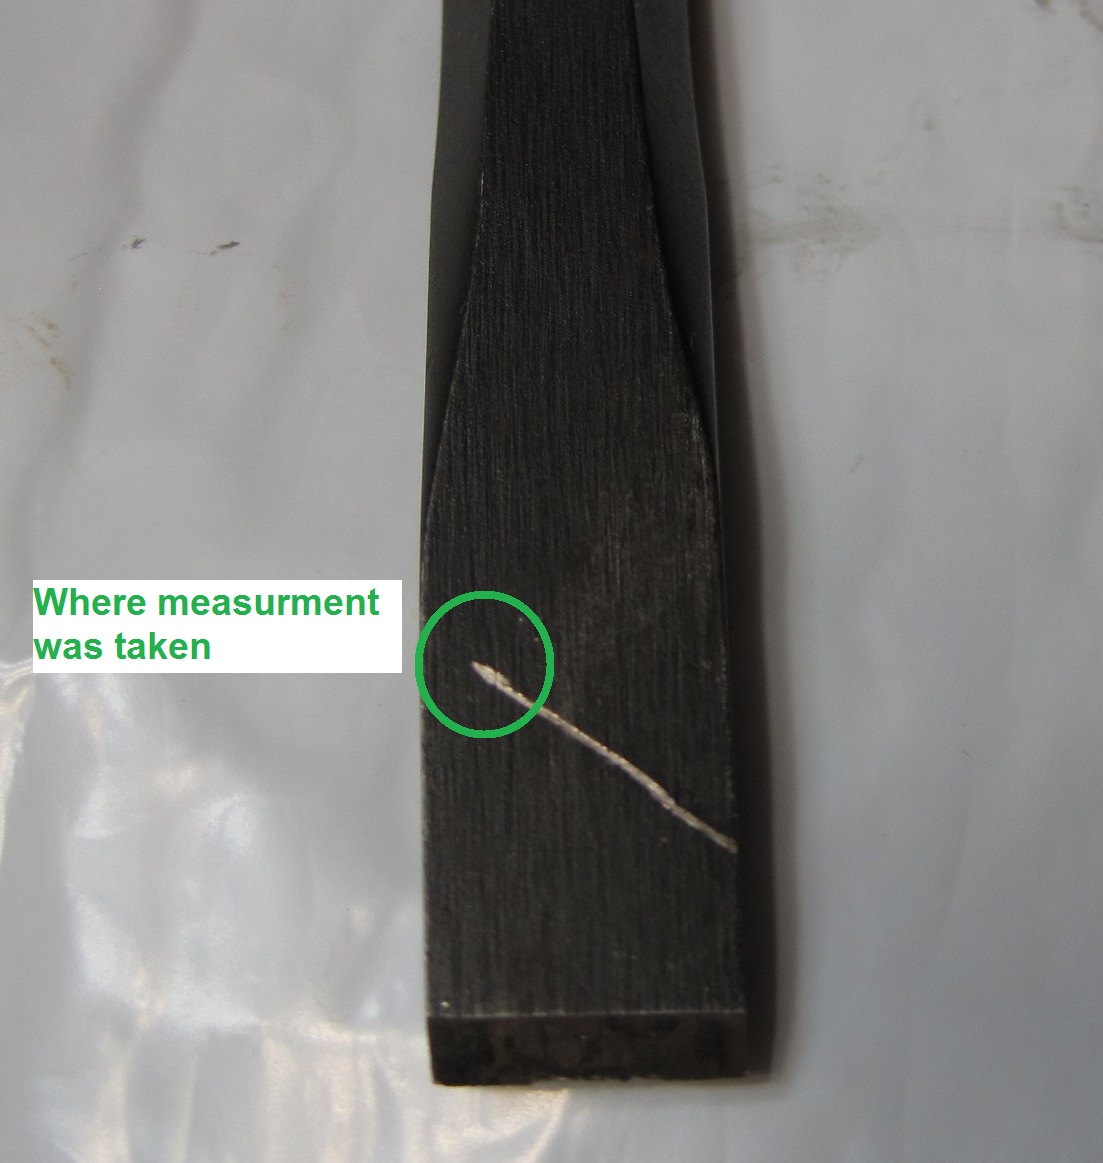
2) For the "Cartridge Angle" I currently use a 1/2 chisel pictured below
I make an index mark on the chisel at the specified measurement.
Force it into the magazine as shown lined up parallel with the magazine body.
I need to go PAST the index mark I made because the body will spring back some.
I carefully do this until I get to the measurement I want
I want it to just GAGE at the index mark, I want it to hit the mark "freely" not forced.
I have set all my magazines to these settings as well as many others and it has made a VERY noticeable difference and I now have full confidence in all my magazines.
And helping some others,,
SO,, it is not an exact solution just yet.
Basically I have found MOST new magazines are not "open" enough in the feeding area,,
ALSO you can use your magazine as a gauge to see different rim sizes, load 10 rounds and make note of where your button ends up with various ammo, it will vary.
I use a TWO PART fix to get magazines to feed right
The rear lips control the height and angle of the round. It's a two step procedure to get the feeding correct. The "rear" of the rear lips controls height, open this area to get round higher in magazine so bolt will grab it properly.
The "front" of the rear lips controls the angle of the round, once you open the rear you load a few rounds in the magazine and test how high the nose can go without forcing it. The top of the FRONT lips should land about middle of round and you can adjust angle from there for feeding,, you can tighten or open it to adjust angle.
The MAIN thing is to get rims engaging the bolt properly so that is the first step.
1) For the "Rim Height" I use the PUNCH pictured below with the measurement shown
I make an index mark on the punch at the specified measurement.
Force it into the magazine at the REAR as shown lined up parallel with the magazine body.
I carefully do this until I get to the measurement I want
I need to go PAST the index mark I made because the body will spring back some.
I want it to just GAGE at the index mark, I want it to hit the mark "freely" not forced.
This is just a good measurement but rarely I may find it too much or too little for a pistol,
I adjust it to my needs.
2) For the "Cartridge Angle" I currently use a 1/2 chisel pictured below
I make an index mark on the chisel at the specified measurement.
Force it into the magazine as shown lined up parallel with the magazine body.
I need to go PAST the index mark I made because the body will spring back some.
I carefully do this until I get to the measurement I want
I want it to just GAGE at the index mark, I want it to hit the mark "freely" not forced.
I have set all my magazines to these settings as well as many others and it has made a VERY noticeable difference and I now have full confidence in all my magazines.
 |
 |
 |
 |
 |
Been getting requests for this information so I'm putting it up,
If Tandemkross makes a video on it and does NOT credit their source just remember where it came from originally. I hate sleezbag tactics like that, but anyway on to the information.
If Tandemkross makes a video on it and does NOT credit their source just remember where it came from originally. I hate sleezbag tactics like that, but anyway on to the information.
I have found many "feeding" issues are magazine related,,,,,
But some are not. If the hull of the spent round is still in the receiver and caused a "stove pipe" it's most likely extractor or ejector related.
Your magazine feeds ammo up to a "moving" bolt,,
You fire the pistol and the force of that explosion drives the bolt back
The recoil spring pushes the bolt forward again
In this cycle the bolt should catch the upper part of the rim of the next cartridge
If the cartridge does NOT stick out of the magazine enough then the bolt does not "grab" it as it should and you will tend to have bullets stuck on the base of the ramp or hitting the top of the chamber
Click on image to enlarge
Click on image to enlarge
 |
 |
 |
Click on image to enlarge
 |
Click on image to enlarge
THIS IS WHAT "I" DO ON "MY" EQUIPMENT
Modify "YOUR" equipment on "YOUR" own liability
I am in no way saying you should do this
I'm just sharing what has worked for me personally
Modify "YOUR" equipment on "YOUR" own liability
I am in no way saying you should do this
I'm just sharing what has worked for me personally


HEY YOU!
SIGN UP on our
email list to get
.
EMAIL ONLY sales
.
Gun Show updates
.
Changes in our Store
hours and more,,

SUBSCRIBE
To our email List
We mail COUPONS!!
To our email List
We mail COUPONS!!

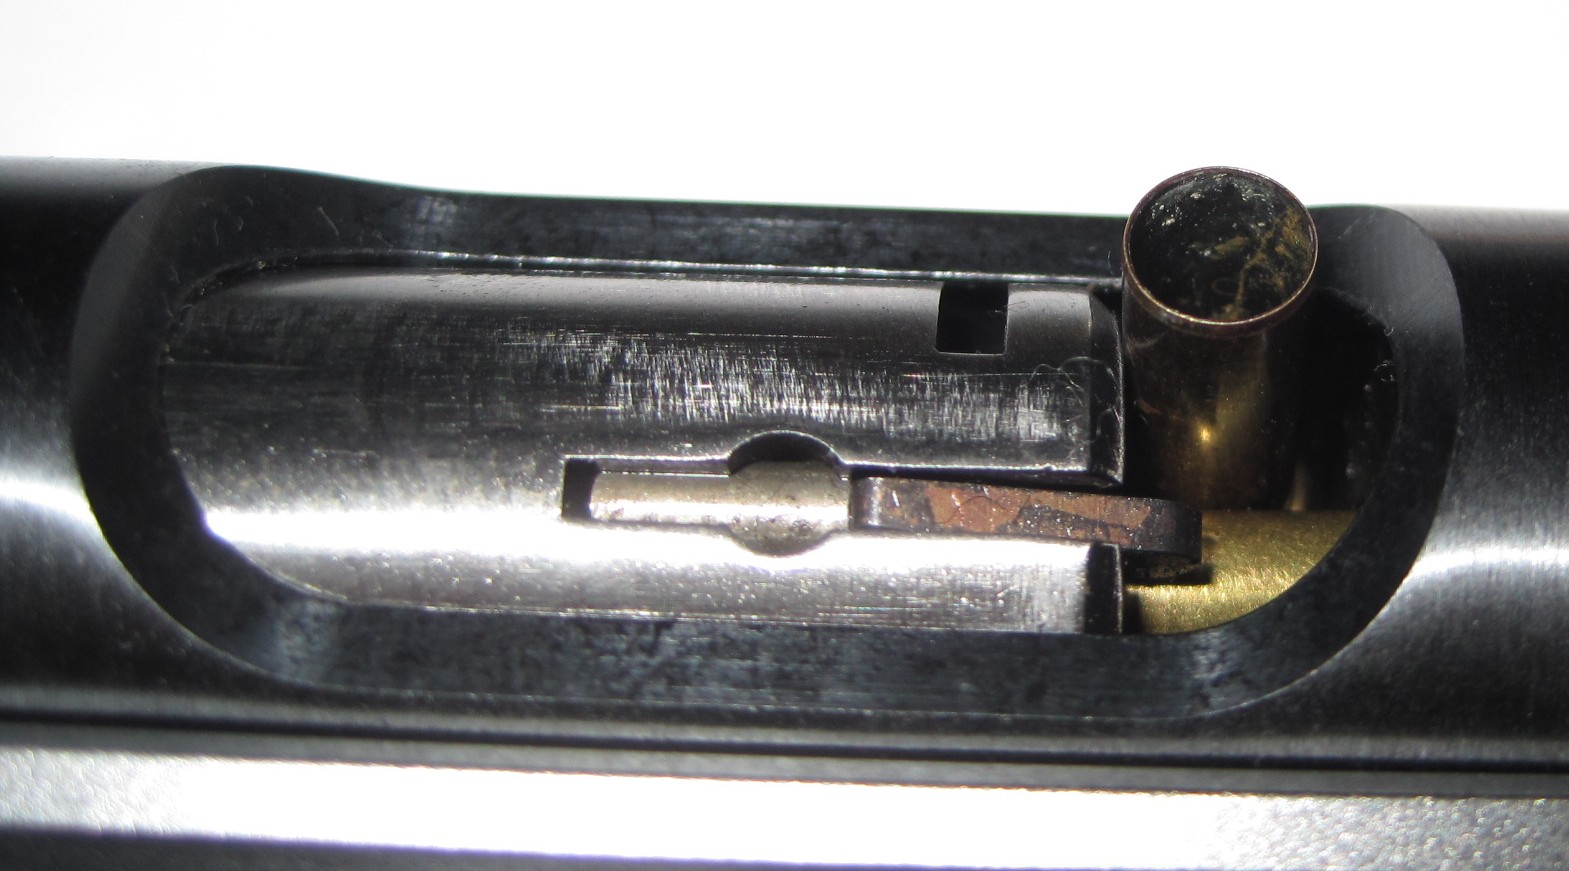
Your Magazine CAN cause "Stove Pipes",,,,
Your REAR set of feed lips can contact the Rim of the spent case. This can happen if the Front (higher portion) of the Rear feed lips are too high in the chamber. This will vary magazine to magazine and gun from gun. It can change any time you move an upper to a different frame. Keep in mind your Upper controls the height of the Bolt while your Lower controls the height of the Magazine. Swapping uppers and lowers changes the overall dimension of where the Magazine is in reference to the Bolt.
If the Front Tip of the Rear Feed Lip is hitting the case, simply file it down "just Enough" to clear, then you will have to work the rough edges smooth and check your bullet angle again. May need to repeat these steps until proper clearance remains.
The FIRST picture below shows PROPER clearance (Green Arrow) from Feed Lip to Case Rim. If they were touching the case would be ejected prematurely (prior hitting Ejector) and this could leave the empty case in the chamber after the bolt has cycled causing a "Stove Pipe".
The SECOND picture shows a typical "stove Pipe" and you can see how it's named that.
 |
Click on image to enlarge
THIS IS WHAT "I" DO ON "MY" EQUIPMENT
Modify "YOUR" equipment on "YOUR" own liability
I am in no way saying you should do this
I'm just sharing what has worked for me personally
Modify "YOUR" equipment on "YOUR" own liability
I am in no way saying you should do this
I'm just sharing what has worked for me personally